はじめに
2024年6月からカナダ・バンクーバーで留学中のアラサー元教師です。2025年3月19日~22日の3泊4日で、日本から来てくれた友達と一緒にイエローナイフへオーロラを見に行きました。今回はその様子をレポートしたいと思います。
Hello! I’m a former teacher from Japan, and now I’m studying abroad in Vancouver, Canada. I’d like to introduce my trip to Yellowknife to see the Aurora.
イエローナイフの基本情報
イエローナイフとは?
カナダのノースウェスト準州の州都で、世界有数のオーロラ観測地として知られています。自然に囲まれた静かな町で、冬は幻想的なオーロラ、夏は白夜が楽しめます。
気温と気候
イエローナイフは亜寒帯気候で、年間を通して寒さが厳しいのが特徴です。
- 冬(11月~3月):平均気温 -20℃~-40℃(極寒!)
- 夏(6月~8月):平均気温 10℃~25℃(過ごしやすい)
- オーロラ観測のベストシーズン:8月下旬~4月上旬
行き方(バンクーバー発)
バンクーバーからイエローナイフへは飛行機で行くのが一般的です。
- バンクーバー国際空港(YVR) から カルガリー国際空港(YYC) へ(約1時間30分)
- カルガリー国際空港で乗り継ぎ
- カルガリーからイエローナイフ空港(YZF) へ(約2時間)
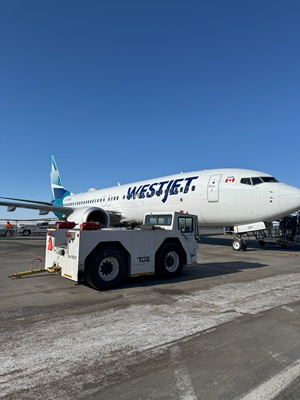
カナダ国内の航空会社(Air CanadaやWestJetなど)が運航しており、季節によっては直行便がある場合もあります。フライト時間は乗り継ぎを含めて約4~5時間です。
Yellowknife is one of the most famous destinations to see the Aurora. It is located in the Northwest Territories of Canada. In the winter, you can enjoy the Aurora, and during the summer, you can experience the midnight sun. The city is also known worldwide for its freezing temperatures, with the minimum temperature reaching around -40°C during the winter. The best season to see the Aurora is from the end of August to early April. I traveled there by airplane, with a layover in Calgary, and the total flight time was about 5 hours.
オーロラ観測ツアー
今回は、日本人ガイド付きのオーロラ観測ツアーに参加してきました!
ツアースケジュール
迎えの時間・場所:
夜9:45にバスで迎えに来てくれて、ダウンタウンから離れたロッジまで約1時間の移動。
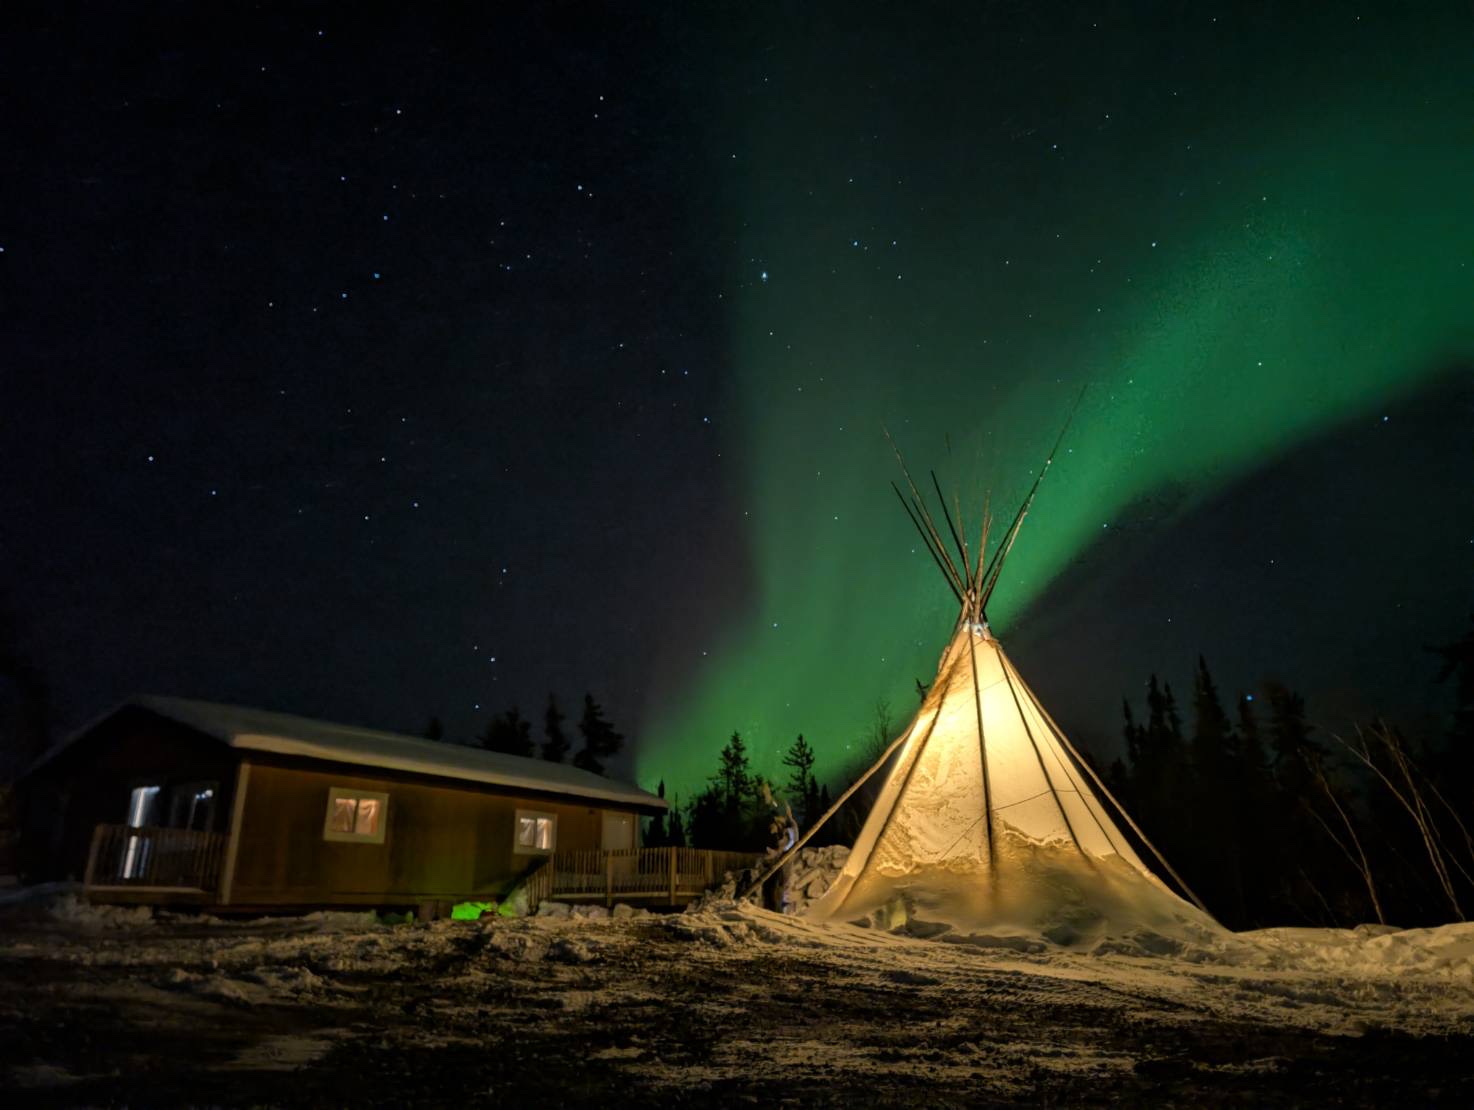
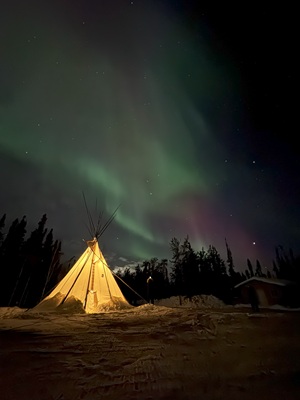
ロッジでのオーロラ観測:
ロッジ前の広いスペースで自由にオーロラを楽しみました。
ロッジ内にはコーヒーや紅茶、クッキーが用意されていて、自由に楽しめます。
自分でカップラーメンを持参して食べている人もいて、お湯も自由に使えるので安心!
深夜まで自由に観測:
深夜2時まで、自分のペースで外に出たりロッジで休んだりして観測。
ガイドさんが写真を撮ってくれるサービスもあって、Facebookから無料でダウンロード可能でした。
送迎サービス:
バスで深夜3時ごろ、宿泊先のホテルまで送り届けてもらいました。
I joined a Japanese Aurora tour. The bus picked us up at 9:45 p.m. and took us to a lodge about an hour away from downtown. At the lodge, we could help ourselves to snacks and drinks, stay warm indoors, and step outside to watch the Aurora. The tour guides also took free photos of us with the Aurora, which we could download through Facebook. At 3:00 a.m., they dropped us off at our hotel.
オーロラを見た感想
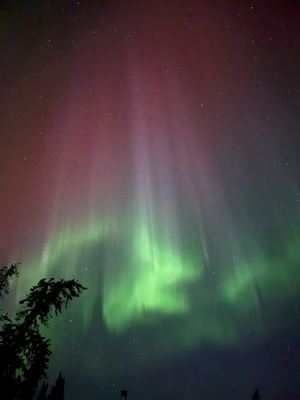
- オーロラにはレベル5から1まであり、レベル5を見た時は本当にすごかったです! 1日目のロッジを出発する直前、深夜1:30ごろに見れたのですが、肉眼でも緑色のカーテンがゆらゆら揺れているのがはっきりと見えました。「これぞ、イメージしていたオーロラだ!」と、目を奪われました。

- ただ、レベル2〜3くらいのオーロラだと、空にモヤがかかっているような感じで、肉眼では色がわからないこともありました。ガイドさんによると、もし写真を撮ってみて色がついていればオーロラ、色がついていなければ雲だそうです。オーロラの色を肉眼で確認できた時はとても嬉しかったです。
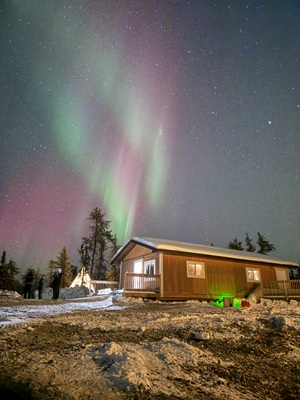
「初めて見たときに、写真の色と違って、がっかりしたんだよね🤣」と言っているイタリア人の友達がいて、その意見があながちわからなくもない(笑) - オーロラには、緑だけでなく、赤やピンクなど、他の色も存在するようです。オーロラは太陽から発せられる太陽風が空気中の窒素や酸素と反応してできるものらしく、その反応の仕方で、色が変わるそうです。肉眼では赤いオーロラを見ることはできませんでしたが、写真で赤色のオーロラも見ることができて、うれしかったです。まるで、スイカのようで可愛かったです🍉
- オーロラだけでなく、星空も本当に綺麗でした! 流れ星も見れたし、宇宙ステーション(他の人が言ってたので、確かかどうかはわかりませんが)も見れました。夜空の美しさに感動しました。
- 初日は-30度で、手袋ではスマホが反応せず、素手で写真を撮っていましたが、寒さに耐えきれず途中で諦めてしまいました。しかし、次の日とその翌日には-20度を超えても体が慣れてきたのか、寒さを感じなくなりました。10度の差って、こんなに大きいんだなと実感しました。
I saw the Aurora for the first time. The tour company ranked its visibility from level 1 to 5, and on the first night, we were lucky to see a level 5 Aurora. It was waving like a curtain and appeared green around 1:30 a.m.
I joined the Aurora tour for three nights, but on the other nights, the Aurora wasn’t as clear—it looked more like fog in the sky. The Aurora can appear in different colors. I took a photo of a red Aurora, which wasn’t visible to the naked eye, but in the picture, it looked like a watermelon and was so pretty.
We also saw lots of stars, which were amazing. On the first night, the temperature was freezing at -30°C, but the next night it was -20°C. As the days went by, I gradually got used to the cold, so by the second and third nights, I didn’t feel as frozen.
オーロラツアー参加のアドバイス
服装(スマホに反応する手袋持参)
ツアーでは防寒着(ジャケット、ズボン、手袋)が貸し出されるので、寒さ対策はばっちり。ただ、スマホが反応する手袋は持っていくのがおすすめです。素手で写真を撮るのはかなり大変でした。
三脚の持参
写真を撮るときはスマホのナイトモードを使って、10秒間動かないように設定することが多いので、三脚があると便利です。
私は充電式で手振れ防止機能付きの三脚を使っていましたが、極寒で電源が落ちることもあったので、シンプルな三脚の方が安心かもしれません。
早めの予約
ツアーは人気があるので、早めに計画・予約するのがおすすめです。
私たちは1ヶ月前に旅行を決め、飛行機代とツアー代(ホテル、3日間のオーロラツアー、ホテル送迎、犬ぞりツアー)の合計で約$2000ほど。飛行機代がツアー代金を越えてました🥲
友達(台湾人)の話では、ツアー内容が若干異なるものの、約$1100くらいで参加していたみたいです。
高いお金を払っても、見られる景色や体験は絶対に価値があるので、ぜひチャレンジしてほしいです!
Through this trip, I’d like to share three tips:
- Bring your own gloves that work with a smartphone: It was really hard to take photos with bare hands in freezing temperatures.
- Bring your own tripod: You can take photos using Night mode on your smartphone. Keeping the camera steady is important, so having a tripod will help you capture the Aurora beautifully.
- Book as early as possible: We booked our trip really late—just one month before departure—so it was super expensive, around $2,000 CAD. My friend told me they booked earlier and paid about $1,100 CAD. The flight cost was even more expensive than the tour package, which included three nights of tours, hotel accommodation, and a dog sledding activity.
おわりに
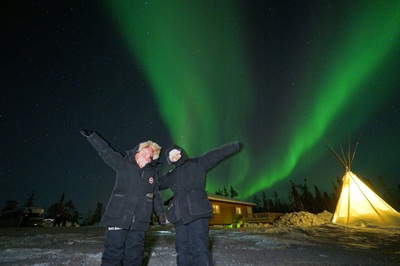
イエローナイフでオーロラを見るのは、カナダ留学中に絶対やりたかった夢のひとつでした。
友達が日本から来てくれて、一緒に夢を叶えられて大満足です。
私は現在、カナダで就職活動中なのですが、イエローナイフやオーロラツアーの求人も時々あったりして、興味を持っていたのですが、極寒の地でガイドをやるのは、中々大変そうだな~とも思いました。
‐30度の中で、私は自分のことに精一杯なのに、お客さんに気を配るガイドさん、本当にすごいなと感じました👏
犬ぞりなど、イエローナイフでの楽しい体験もたくさんあったので、次の記事で改めて紹介しますね!
Enjoy your day🌈
Seeing the Aurora was one of my dreams while studying in Canada, so experiencing it with my friend who visited from Japan made it even more special. Right now, I’m looking for a job in Canada, and before coming here, I was interested in working in Yellowknife. But after this trip, I realized how tough it actually is. I was really impressed by how the tour guides took care of the clients in such freezing conditions. By the way, I had so many amazing experiences in Yellowknife, and I’ll share more about them next time. Enjoy your day! 🌈

コメント